Rain Harvesting Cisterns
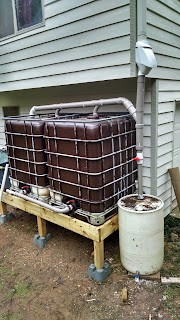
 A friend of ours gave us a couple 330 gallon totes a while back. We've been planning to install them on our largest roof for quite some time. This week, we got them done. Just in time for the weekend rain. Our 900 square foot roof will shed 560 gallons of water per inch of rainfall, so these tanks should be full by Monday.
There are a few important considerations when designing a rain harvesting system, among them is what the cisterns have been previously used for. In an ideal world, we would have received unused food grade totes. Ours came from a landscape yard and used to contain dye used in mulch manufacture. The dyes were made of organic compounds (pretty much the same as food coloring) but there was a considerable amount residue left in the tanks. We used a mop and a pressure washer to clean them out and wound up with a dark puddle in a spot in our yard for a couple years until the soil finally cleared up. This was troublesome whenever it would rain and our dog would walk thru the spot, as he would track black footprints wherever he went. Thankfully, the dye was water soluble so it cleaned up easily, and it finally perked away.
Even though the totes contained relatively safe material, they are not "food grade", so we will not be using this water for drinking. Only irrigation. We figure the tanks are just as safe as the garden hoses, and drip lines and emitters we use in our irrigation system, none of which are designed for potable water use.
Totes are not UV stable, either, and their translucent walls will encourage algae to grow in the tanks when the sunlight hits them. To combat those problems, we cleaned the outside as best we could and spray painted them a brown color with a product designed to adhere to plastic. We went ahead and did this with the fittings and pipe we had purchased for the system, too.
 Since the system will be harvesting rain from our gutter system, we need to make sure leaves and debris do not make it into the tanks. We built a two-step prefilter. First, a Leaf Eater Ultra Rainhead will handle all the large debris. The screened water then travels down a 2" pipe to a 55 gallon drum which acts as a first flush filter. This second step may be overkill. We have a metal roof, so we're not concerned with a ton of petrochemicals getting into our system, and the Leaf Eater should handle most everything larger than a grain of sand. We had originally designed an elaborate check valve to go inline above the first flush so that when it filled, a ball would seal against the top of the valve and keep any water from the barrel from mixing with the cistern water. We decided that this was probably unnecessary, since any contaminates that wound up in the barrel would likely be heavier than water and thus not an issue.
 Water flows up from the first flush tank through a 3" wye and over to the totes, which are connected in-line by 3"x2" wyes that use 2" male adapters, large O-rings, and 2" conduit nuts as a "poor-man's bulkhead fitting". Overflow continues past the tanks through a 3" pipe and will be directed away from the house.
The tanks themselves are connected at their factory valves by 2" flex connectors. There's a spigot for filling buckets, and a 1" threaded plug, where we'll one day install a pump.
The system is not as large as we'd like, but it is more than we had before we started. We feel pretty good about how it turned out, considering how we cobbled it together. We'll put a fresh coat of paint on the whole thing, including the parts that managed to remain unpainted, then eventually cover it with siding to help it blend in with the house. It should supply us with years of service and help take a dent out out of our water bills.
UPDATE: Read about what happened when this cistern filled up with water!


Comments
Post a Comment